Me Made Midweek: Refashioning a skirt
- No Comments
 I’d like to kick off my first “Me Made Midweek” by showing you this skirt I last spring. It was inspired by the Circle Skirt Sew-Along at Elegant Musings’ blog.
I decided this was a good opportunity for refashioning a skirt I had from junior high. It was a low-rise 8-panelled trumpet skirt (so cool in 2002!). Unfortunately, I didn’t have enough fabric to get a full circle out if it, but I did make it as full as possible, high-waisted and vintagesque. That makes it a circle skirt in spirit, right?
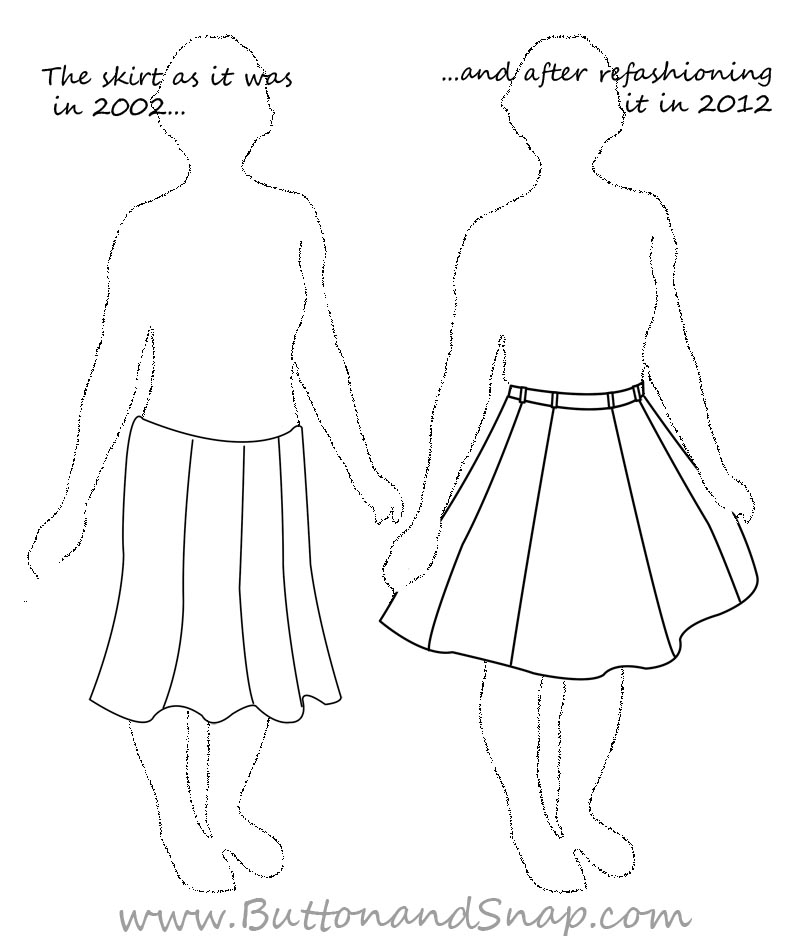
I didn’t get a picture of the original skirt before I cut it up, but the next time I’m at my parents’ house I’ll try and dig up an old photo to share with you. However, to make up for this shortcoming, I have a special treat for you: Diagrams!
As you can see, the original skirt had eight panels, no waistband, flared out at the bottom, and ended a little below my knees. It didn’t fit any more (I’ve grown hips), but I wanted to refashion it so I could wear it in autumn and winter in Berlin. As in many of my projects, the first step in refashioning a skirt was to take it apart completely, which left me with 8 panels.
To determine the new size and shape of the panels, I measured the length from my waist to an inch above my knee. This, plus a ½” seam allowance and a 1″ hem allowance, became the final length of each panel. I then measured my waist and divided this measurement by 8. This, plus 1″ total seam allowance (2 seams x ½”), was the width of the top of each panel. The width of the bottom of each panel was as wide as I could make it.
 I wanted a waistband on the new skirt, but there was no single piece large enough to make one. I ended up cutting a piece of the waistband out of each of the skirt panels and then piecing them together. I took some care to match the stripes on the waistband, though I didn’t have any leeway to do that with the skirt. The belt loops were made out of scraps; I didn’t have much leftover fabric after this project!
On the left, you can see a diagram(woohoo! diagram!!) of how I cut out each piece.
The original version of the skirt had navy blue grosgrain ribbon sewn along each seam. I already have 2 navy blue skirts, so I wanted to highlight the brown in the fabric. I sewed a piece of brown binding between each panel. Each panel of the skirt is also topstitched twice; once to hold the binding down, once to catch the edge of the seam allowance since I don’t have a serger to finish the edges. (I also overcast the edges by hand, but the fabric is loosely woven and unravels easily.)
 Another detail I’m pleased with is the hem. I put in by machine, but I decided to use a zig-zag stitch because it thought it would blend well into the design. Well, it’s virtually invisible. I’ll be using that trick again.
I’m also proud of this:
What? What is that? It’s the zipper! It’s not even an invisible zipper! Cool, huh?
The specs:
Fabric: Fuzzy houndstooth and a shiny brown slinky fabric. Not sure of the fiber content, and don’t care enough to do a burn test. It’s washable.
Pattern: Self drafted
Notions: Zipper, hook and eye (repurposed from the first skirt)
Year: Contemporary
First worn: April 2012
Wear again? Yes
Total Cost: Free


Leave a Reply