
The Joker’s Undies, Part 3: All About the Stays


Last time: I’m making period 18th century underwear for my Joker/Marie Antoinette cosplay. (Design here. Here are the first and second posts about making underwear.)
Today I’m sharing all the good sew-y details of making the stays. This post is, unfortunately, long and not as amusing as I would like it to be. But I hope it will be informative for anyone making 18th century stays. Especially if you are using zip ties for boning or are going the less-historical route of using a sewing machine. If anything I’ve written is unclear or confusing, please don’t hesitate to ask me questions in the comments!!
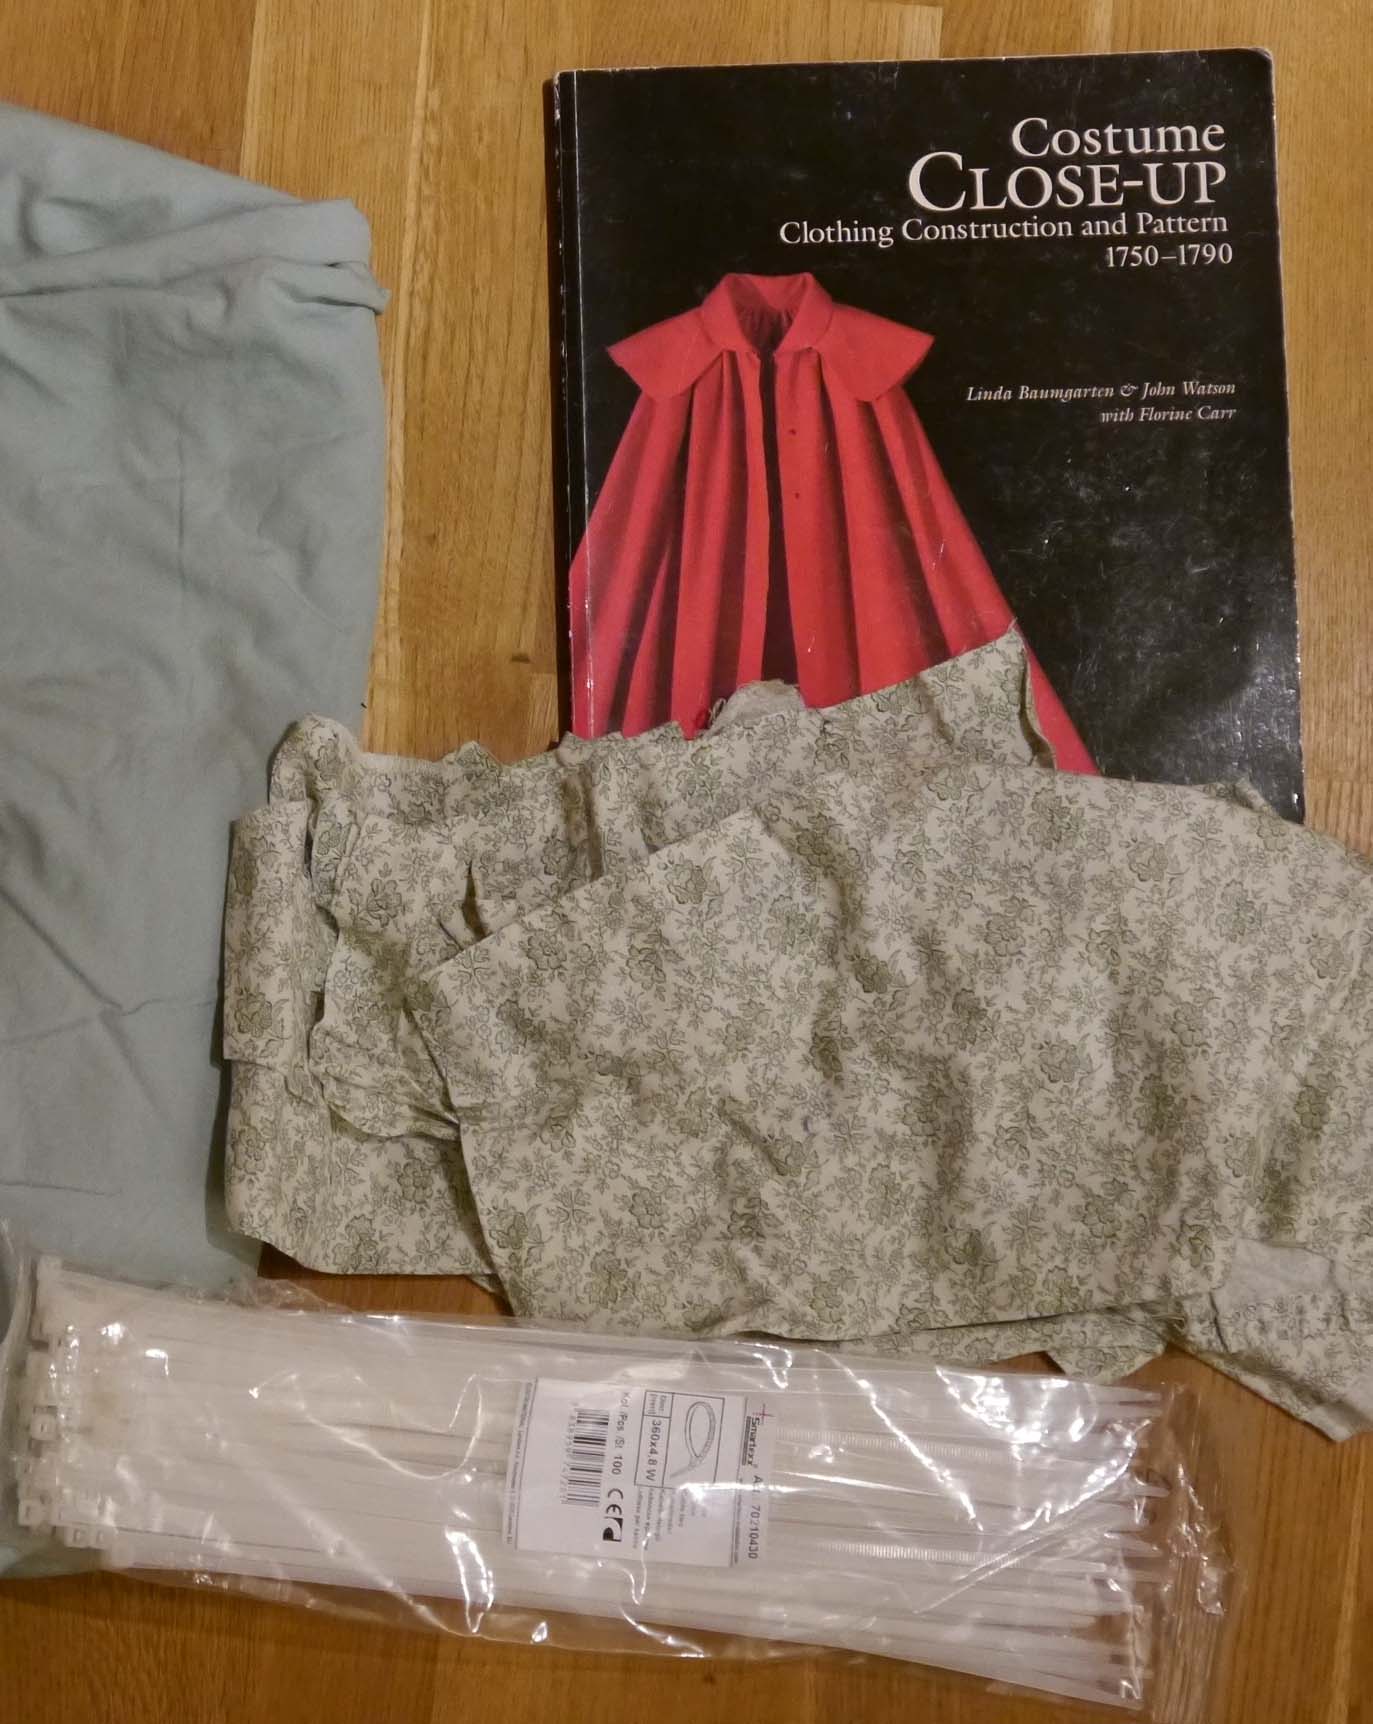
I made my stays using the book Costume Close-Up, which includes a pattern for a fully boned stays taken from an extant American garment. If you plan to buy the book, be aware that the patterns are more reference pieces than ready to be sewn from. You will have to add seam allowances and make fit adjustments on your own. Also, instructions are minimal. The authors record the techniques used to sew the garments, but there is no step-by-step guide to construction. If you are new to sewing, I would recommend buying this as a reference work rather than a set of sewing patterns.
Fitting the Pattern
The book includes finished measurements – a feature missing from Janet Arnold’s Patterns of Fashion. The stays have a bust measurement of 34 inches, waist 28.5 – 29.25 inches. These happen to be exactly my measurements right now. The author doesn’t give a hip measurement, which worried me, because my hips are usually 2 sizes larger than than my top. However, this didn’t turn out to be a problem. The pattern has plenty of room for my hips.
I made an initial mock up of the pattern, but I was so lazy that I only made one half of the pattern and held it up to my body. It looked like just that side was 3 – 4 inches narrower than me. That would have meant a 6 to 8 inch gap at the back – much too wide! I added half an inch to each pattern piece, 5 inches to the total pattern.
Bad idea. I ended taking all of that out in the final pattern. Even then, it laces completely closed on me. Since stays are actually meant to be worn with a gap at the back, I’d suggest using this pattern as is if your measurements are 1 to 2 inches larger than the given measurements.
Sewing Boning Channels
Since the pattern in the book only comes with brief instructions on how the garment was made. I turned to the internet. One of the sites I found most helpful for this was La Couturière Parisienne. I recommend it highly if you’re looking for detailed information on how to make a set of stays.
Each piece of the stays has three layers of fabric stacked together – one layer of floral outer fabric and two layers of white sheet fabric. I sewed through all three layers to make the boning channels. The width of the boning channels is dependent on the boning used. The zip ties I used were 4.8 mm wide. Following the suggestion of La Couturière Parisienne, I made the boning channels 2 mm wider than my boning, which is just about equal to a quarter of an inch. That works well for me because my best rulers are in inches!
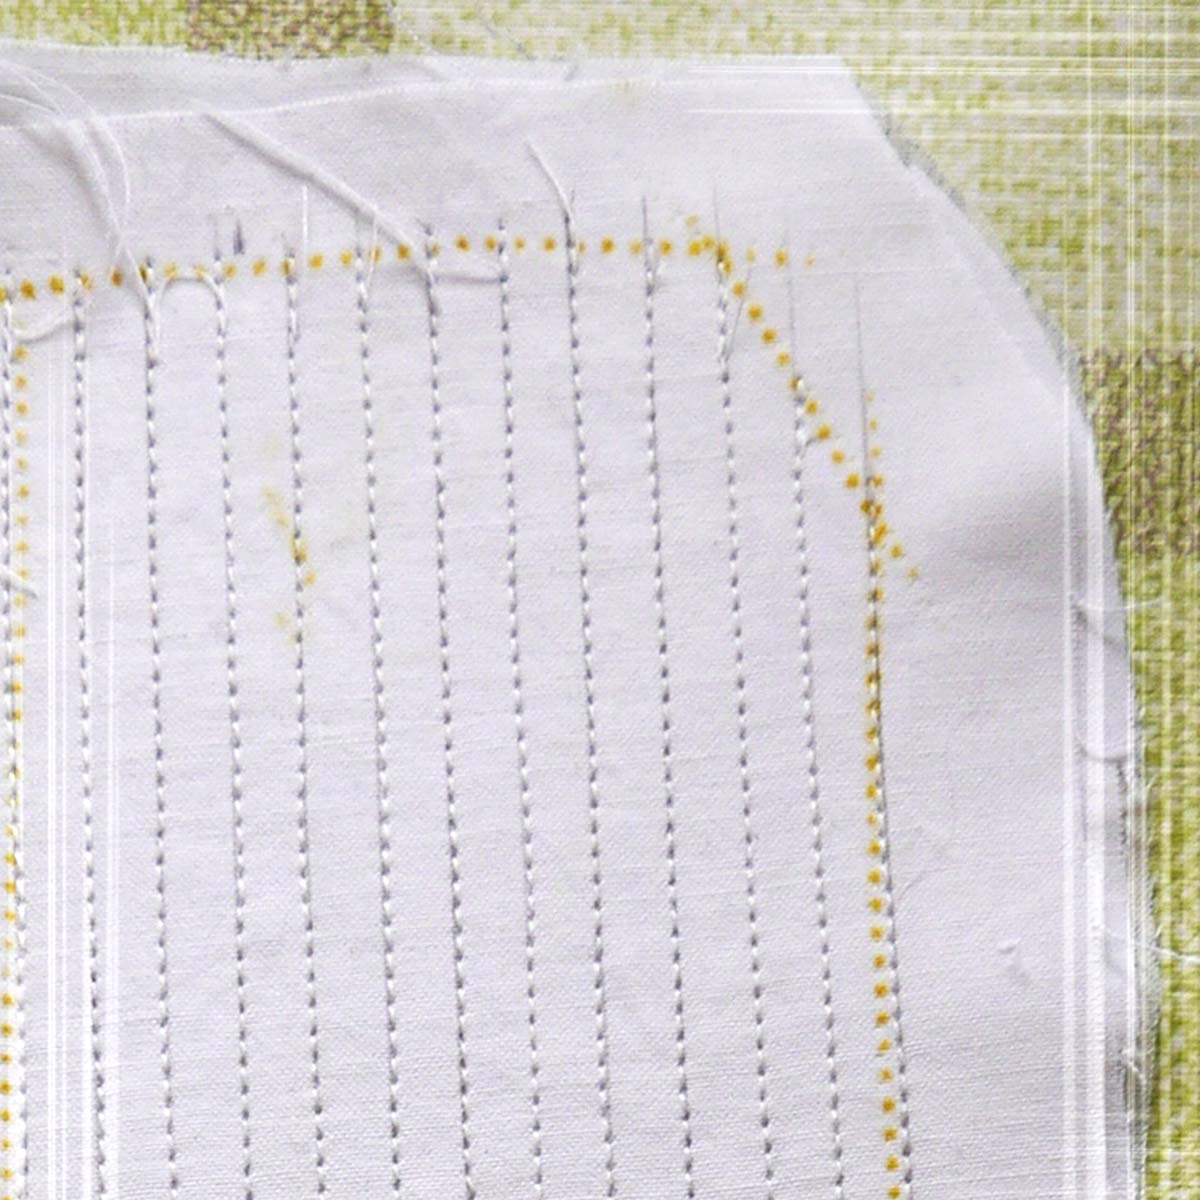
I used clear plastic ruler and a mechanical pencil (because it always stays sharp) to mark all the lines. Mechanical pencil won’t come out of the fabric, so I marked the innermost layer, which will be hidden by a lining in the end. I was initially unsure what to do with the channels at the edges of the piece that were slightly off the edge of the stitching line.

After sewing three boning channels I tested to make sure my zip ties would fit. They fit snugly, but weren’t too difficult to push into the channels.
I found that the easiest way to construct the stays is to sew all the boning channels for each piece, then sew the pieces together. The seams are relatively thick because they are six layers of fabric, but not so thick that it is a problem.
Inserting the Boning
Once I had sewed the pieces together, I inserted the boning. I started with the longest channels first, then worked down towards the shorter channels.
For the shorter channels, I would insert a bone, cut it off the excess, then use the excess for another short channel. Before inserting the excess piece into the next channel, I held the tip up to the end of the boning channel. I marked the angle that the channel was cut off at by a seam onto the tip of the zip tie using a pencil. Then I cut off the end of the zip tie at that angle so that it would fit snugly up to the seam at the end of the channel. If the tips were very pointy then I had to round them off slightly. Otherwise, they poked through the fabric when I was trying to insert them.
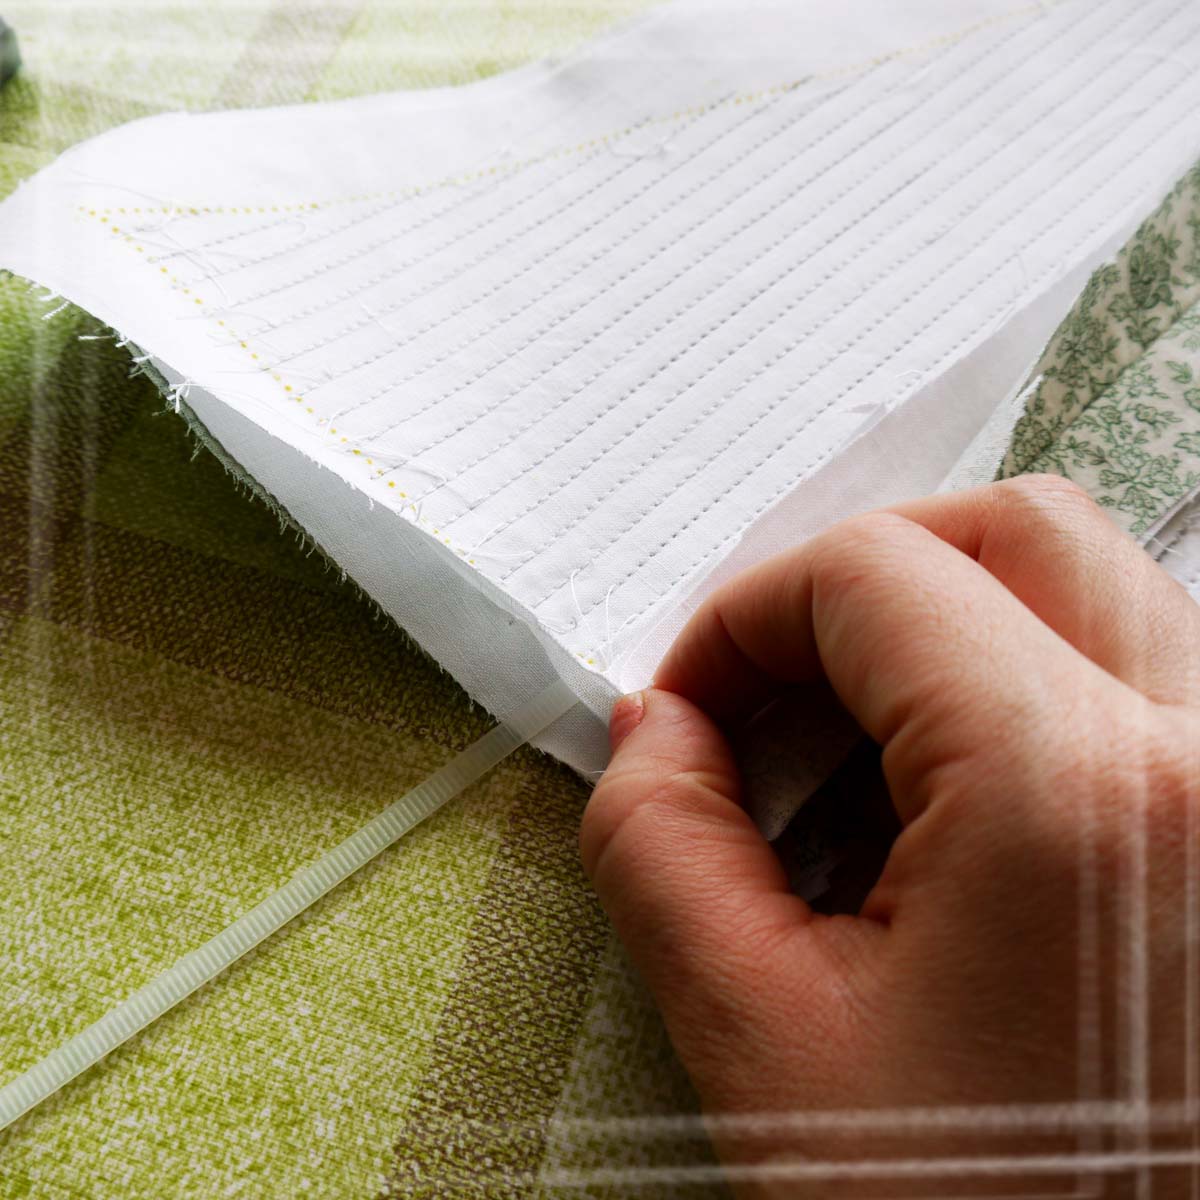
I ended up moving some seams to better accommodate the channels – for instance, adding 1/16th of an inch to one piece and removing 1/16th of an inch from the adjoining piece so that both edges lined up with the edges of the boning channels. On other pieces I simply left the too-narrow channels unboned. This worked just fine.
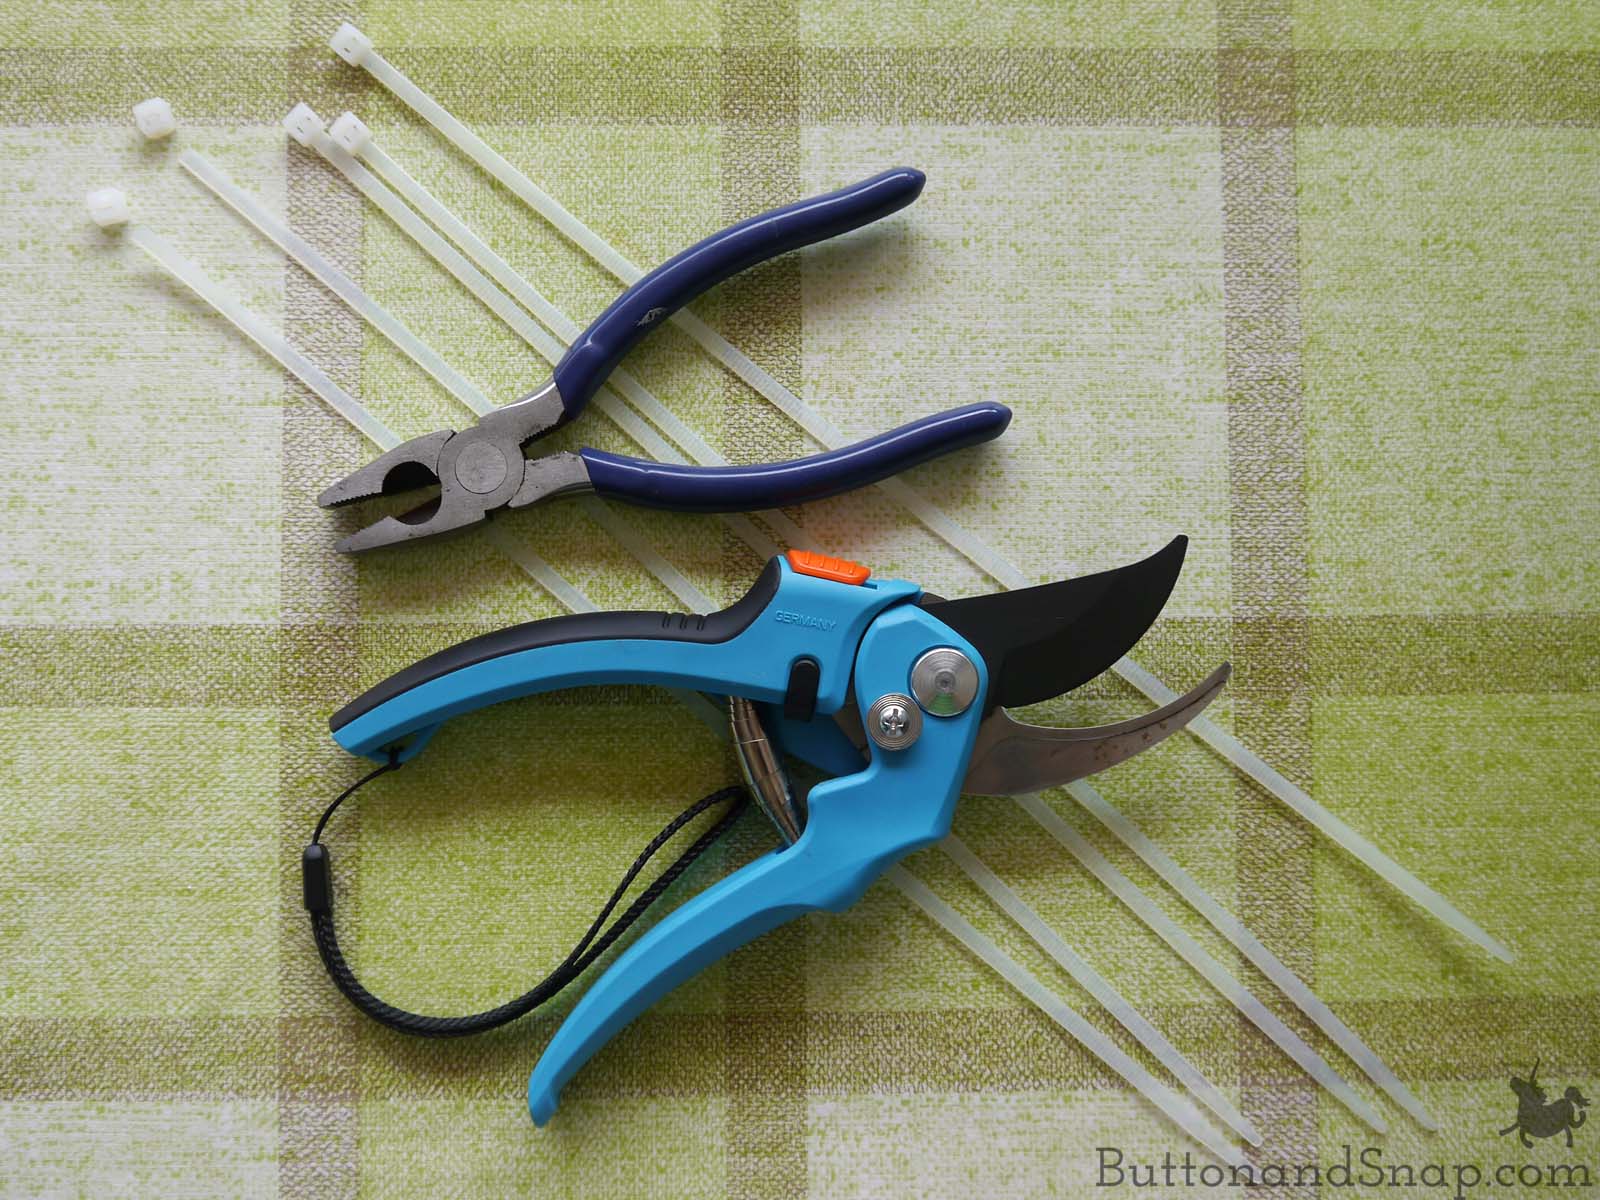
Cutting the Zip Ties for Boning
The zip ties I used for boning are 14 inches long. I used garden shears and wire cutters to cut the square clasp off the end of each tie – my garden shears were better for the job. After inserting the bones, I cut off any excess length.
The center back pieces of the stays are about 15 inches long – longer than the zip ties. So, I inserted two overlapping zip ties to fill the entire length. For each channel, I inserted the zip tie from the top with the pointed side first. I pushed the tie in until the end of it was flush with the top of the stays. This left an inch or so a the bottom that was not boned. Into this space I inserted a second bone from the bottom, pointed side first, and pushed it up until the points of the boning overlapped. Then I cut off the rest of the zip tie that was hanging out.
Here is a drawing of how the zip ties overlap.

Binding the Edges
Once all the bones were inserted, I bound the edges with pleather left over from a failed attempt to make my own placemats.
Yes, I used faux leather. I didn’t have leather in a matching color. Though I briefly considered binding the edges in plain cotton, I went for the tacky choice that looks good from afar!
I used my sewing machine to attach the leather binding, setting it to the longest stitch length possible. My plan to stitch through the fabric between the bones. It turned out that my normal 90/14 needle could also stitch through the zip ties without a problem! However, I still recommend leaving the stitch length long and working slowly.
I stay-stitched once around the edge. Then I sewed the binding to the edge with right sides together and seam allowances matching.
After initially attaching the binding, I folded it back over the edge of the stays and stitched it in place with the machine – stitching close to the edge of the binding so that the stitching disappears into the fold of the binding. This is difficult around the hip tabs; I cut notches as needed in the binding and pinned everything carefully before I started sewing.
Next, I sewed the lining in by hand. This is show in the very first picture of this article.

Making the Lacing Holes
In the 18th century, metal grommets hadn’t been invented back o the lacing holes were simply sewn around the edges with an overcast stitch, a much less sturdy finish. I did this too, less for historical accuracy than because I didn’t have metal grommets or a way to set them and I didn’t want to shell our for that.
Stitching by hand took a while. And the holes look pretty …ratchet. You can see the view from inside and outside in the above picture. The look better in the photo than in real life. I don’t think an 18th century staymaker would hire me on the strength of that stitching!
Luckily, the stays in Costume Close-Up had a leather strip wrapped through the lacing holes to help protect the fabric. Since I’m using fake leather, which is much less sturdy, doing this doesn’t make much sense. But it hides half of my crummy stitching job so I’m doing it anyways!!!
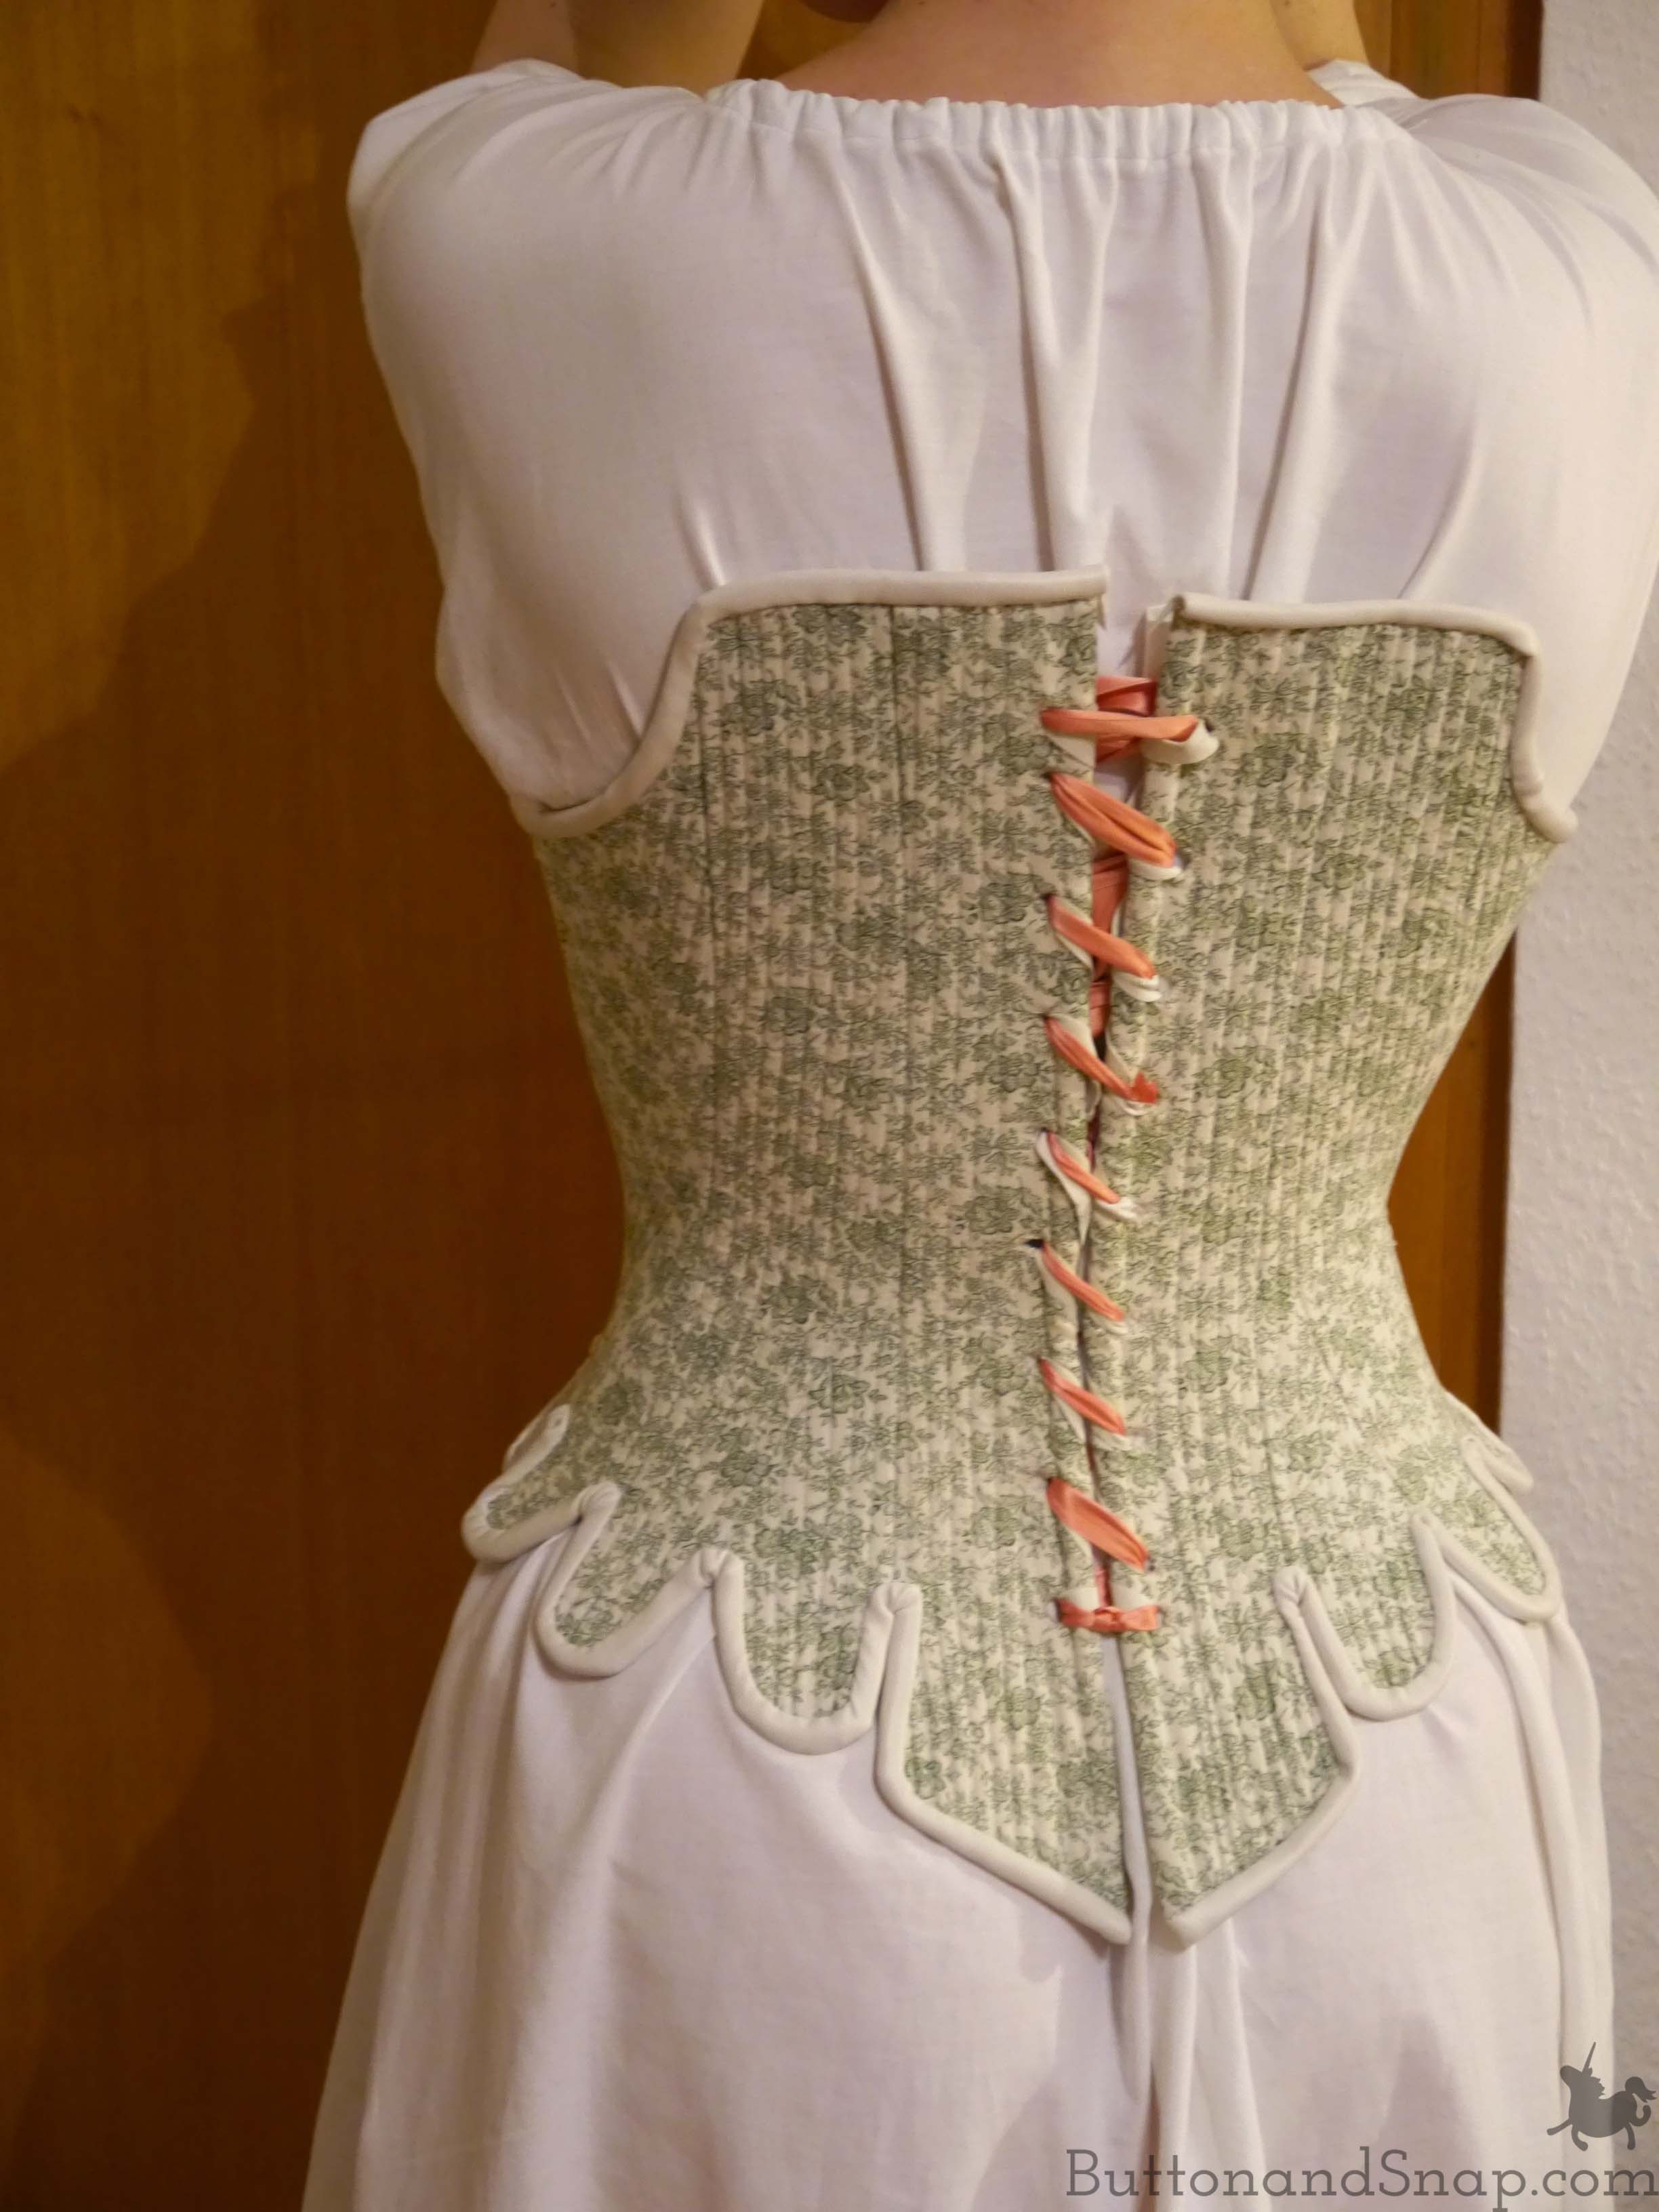
18th century stays were laced using spiral lacing – one ribbon that zigzags back and forth. The lacing we’re used to seeing – more like a pair of tennis shoes – was first used in later centuries. According to my book, the ribbon is secured at the top and bottom with a half-hitch knot (Not up on your knots?? – I looked it up here on Youtube. I wonder if the wilderness survival type doing the demonstration ever imagined he’d be helping someone like me knot their stays?? XD)

For spiral lacing, you want the top and bottom holes of the stays to line up – but the rest of the holes to be staggered. To do this, the second hole from the top on one side, and the second hole from the bottom on the other side, are spaced half the distance as the rest of the holes. See picture below:

Putting on the Stays
Since I’m lacing up the stays myself, I found that it works best to use a reeeeeeeeeeeeeeealllllllllly long ribbon (or several sewn together). I thread it through all the holes before I put the stays on – leaving a 10″ gap. Then I slip it over my head and pull the laces tight behind me. This has to be done little by little, pulling each rung taut and working down to the end, then repeating until the stays are as tight as you want them.
This involves a lot of cursing.
I’ve tried knotting the ribbon at the bottom and pulling all the excess to the top, which is how the stays have been done in the previous pictures.
And I’ve tried knotting the ribbon at the top and pulling the excess down, which is pictured here:

The biggest difference is which muscles in your arms start to hurt. Also, I was too tired to figure out how to knot the stays shut by myself, so I ended up with a gap at the end each time. Next time I’ll do up that knot it so it stays shut.
Whichever direction you pull, you’ll end up with a 10 foot tail at the end. Loop up the excess and gather it in a loose bow. Tuck it into the stays to hide it.

Now do a happy dance because you’re done!!!
Update: An earlier version of this article used the terms stays and corset interchangeably. However, an 18th cen. shaping garment like this one is more commonly referred to as stays. The post has been changed to reflect that.
flori
What’s the difference between a corset and stays? Can they be used interchangeably, or are they something different?
Helen
Great question. I’ve done some extra reading on the subject now, which I should have don before I wrote this post… It turns out that nowadays, “corset” is a more general term for a body shaping garment. On the other hand, “stays” is used for shaping garments of the 17th and 18th centuries. Contrast this with Marie Antoinette’s time – around the 1770s. Back then, stays referred to a boned shaping garment. However, corset was a new term at the time, referring to an un-boned or barely boned undergarment. I confess, I should probably have just written stays. Now that I know that, I’ll change the article to reflect that. Thanks for asking such a good question!